
Nymph Rigs
My way

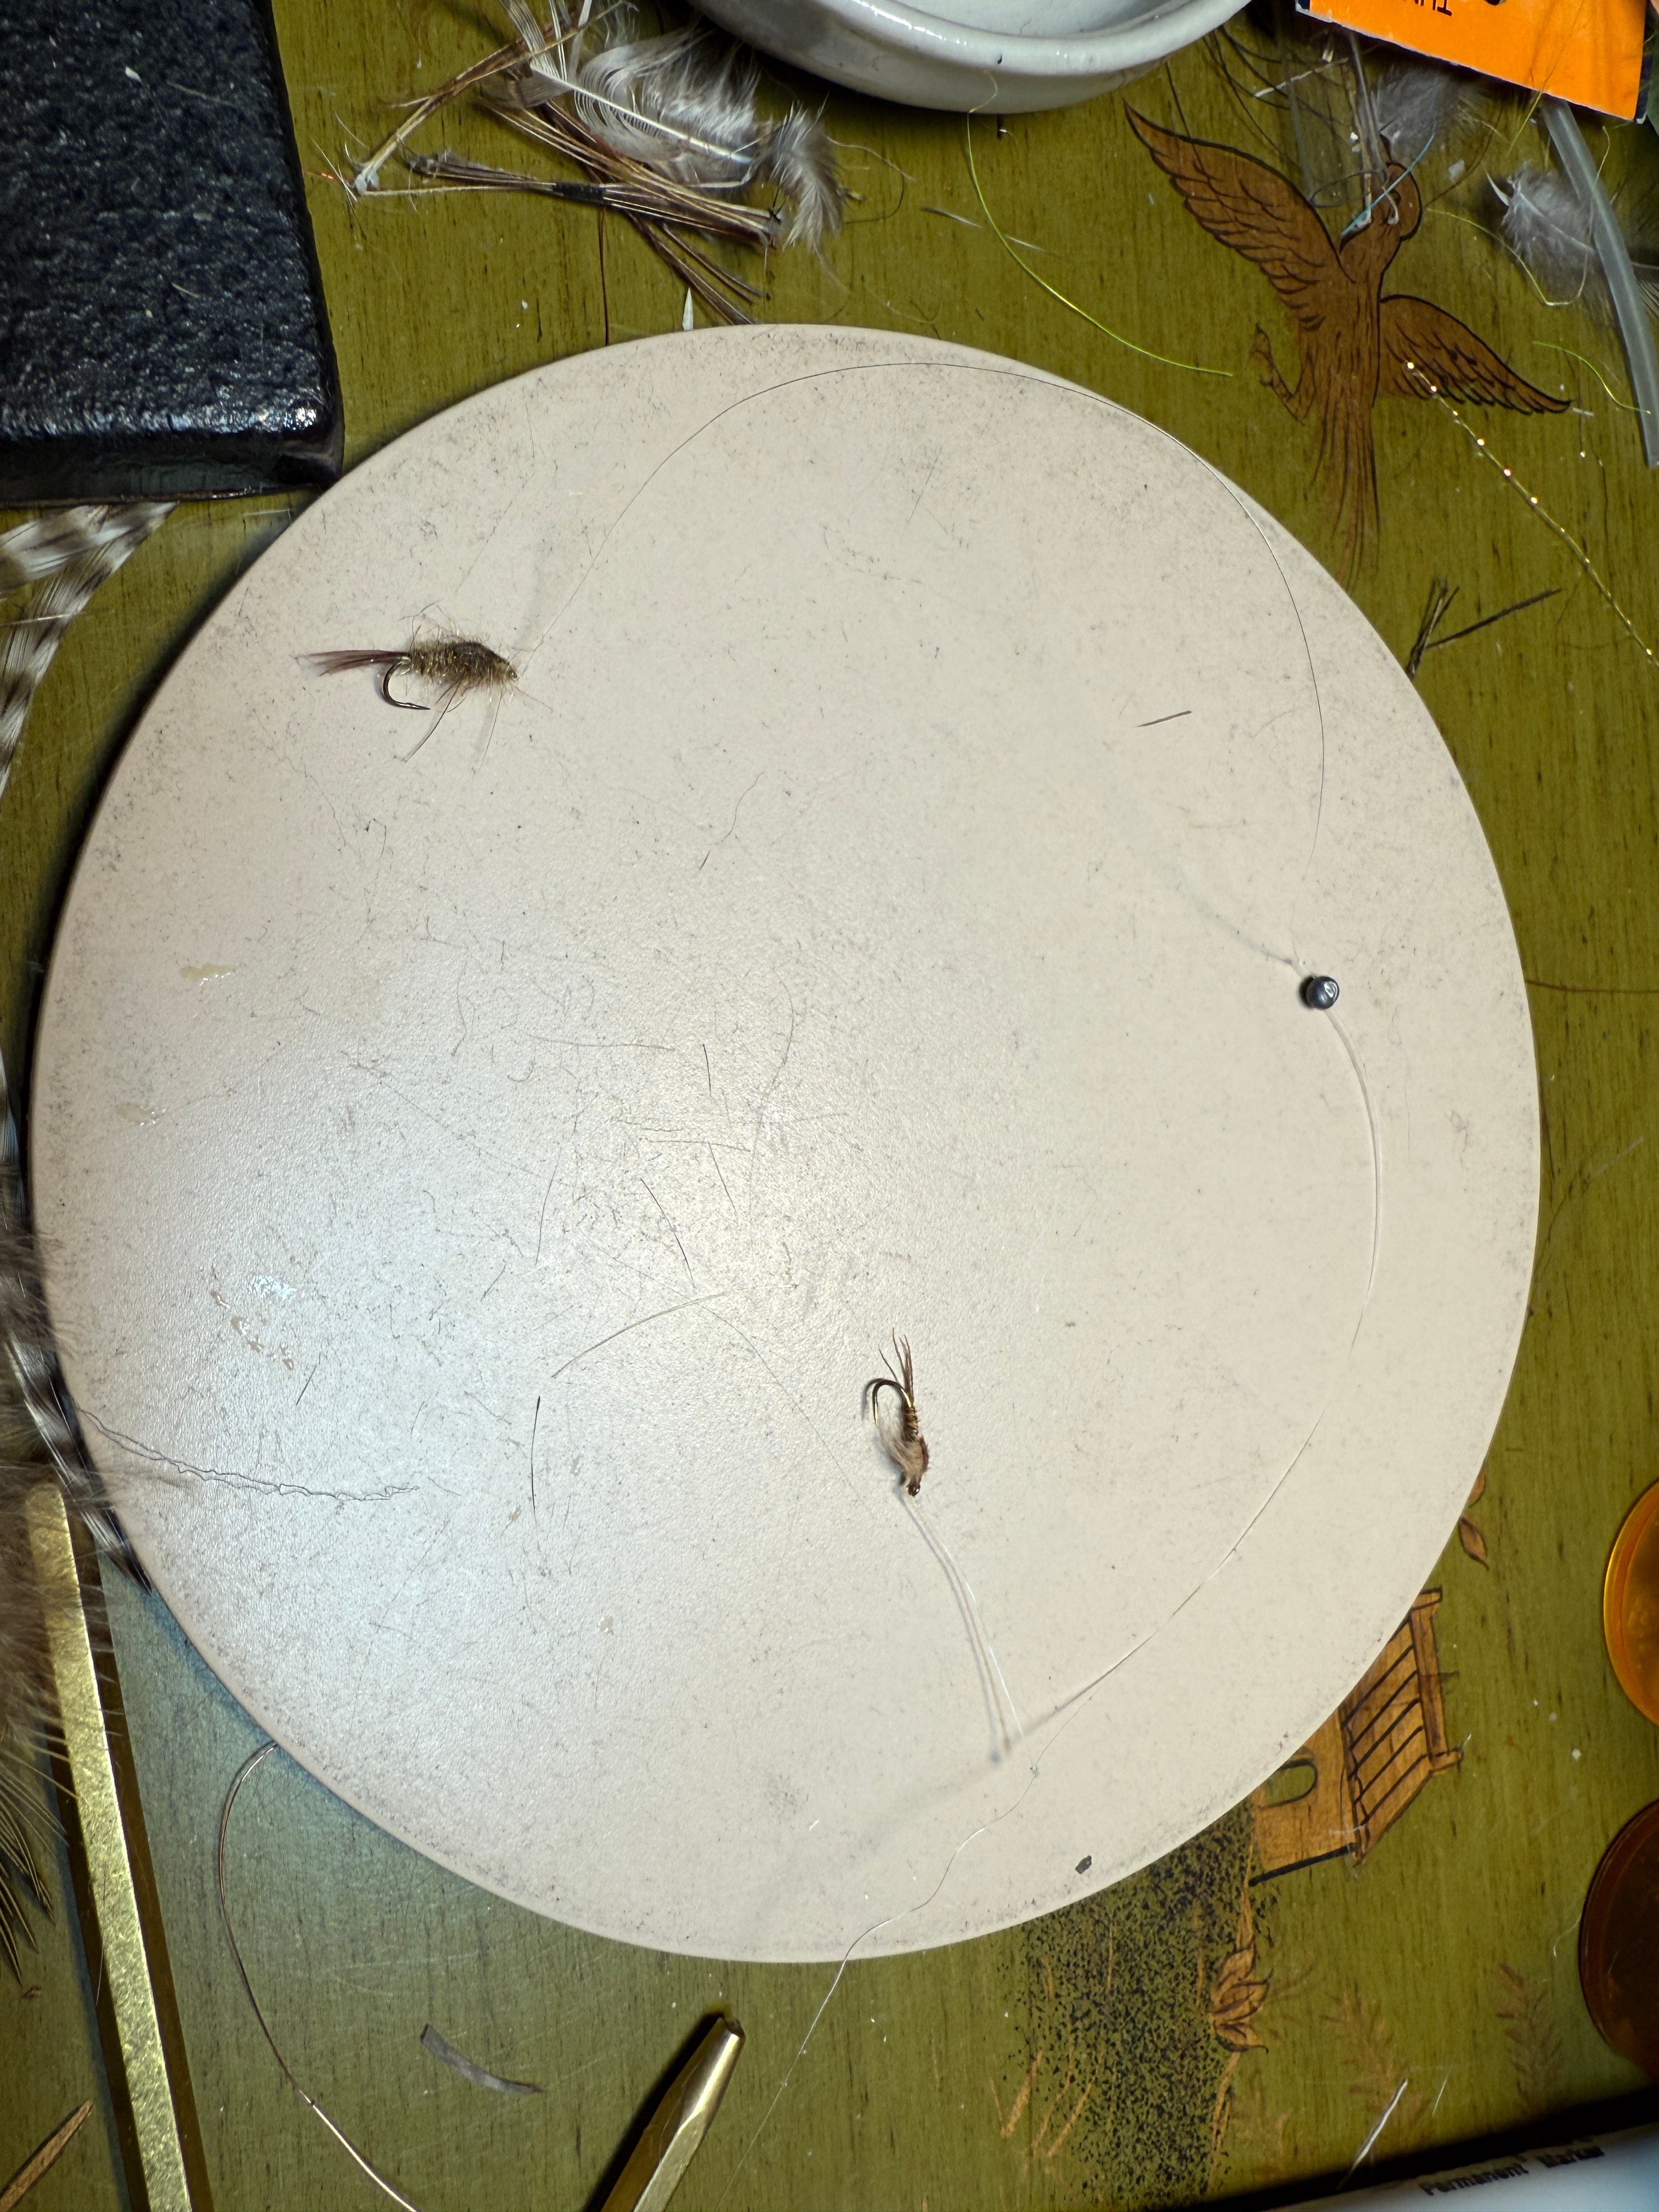
Nymphs, or other underwater flies imitating creepy, crawly, drifty things probably account for more fish than any other form of fly fishing unless you’re a diehard streamer or dry fly fisherman. And I’ll address the dry fly part in another post. One thing at the butt of all sorts of arguments is how to actually construct a rig to fish you nymphs. Everyone has their favorite technique and method. I’d guess some work better than others. This is a discussion of how I fish nymphs. It is not a discussion of patterns, tying methods or other aspects of the fly itself (with one exception), but rather one of how I put these flies onto the end of my leader when I fish them. The one exception is that I’ll touch briefly on how and when I use weighted flies.
If, as you read this, you find that I’m pooh poohing your favorite technique or method, let me apologize up front. I’m just telling you what works for me. I do fish a lot, have done so for a very long time, and generally catch a lot of fish, so maybe there’s a tip or two in here for someone.
Single Nymph with Split Shot
This is probably the most basic way to fish a nymph. When I first started fishing this way we didn’t use strike indicators and the like. We detected strikes by watching the fish, the leader or, in bigger water, the tip of our fly line. It quickly became evident that there were two things that absolutely wrecked one’s hookup percentage. The first was the inability to know exactly where your fly was at any time. The second was a setup where the fish could take your fly and spit it out without impeding the drift of your leader. In both instances the key is actually the point that anchors your leader to the river bed or water column. If you’re using a split shot, the anchor is your split shot. The longer the distance between the fly and the split shot the more ambiguity there is about the position of the fly. Also, when a fish grabs the fly it needs to stop not just the fly but also the anchor. Again, the longer the length of tippet between the fly and the split shot the more the chances the fish can spit the fly out before it affects the drift.
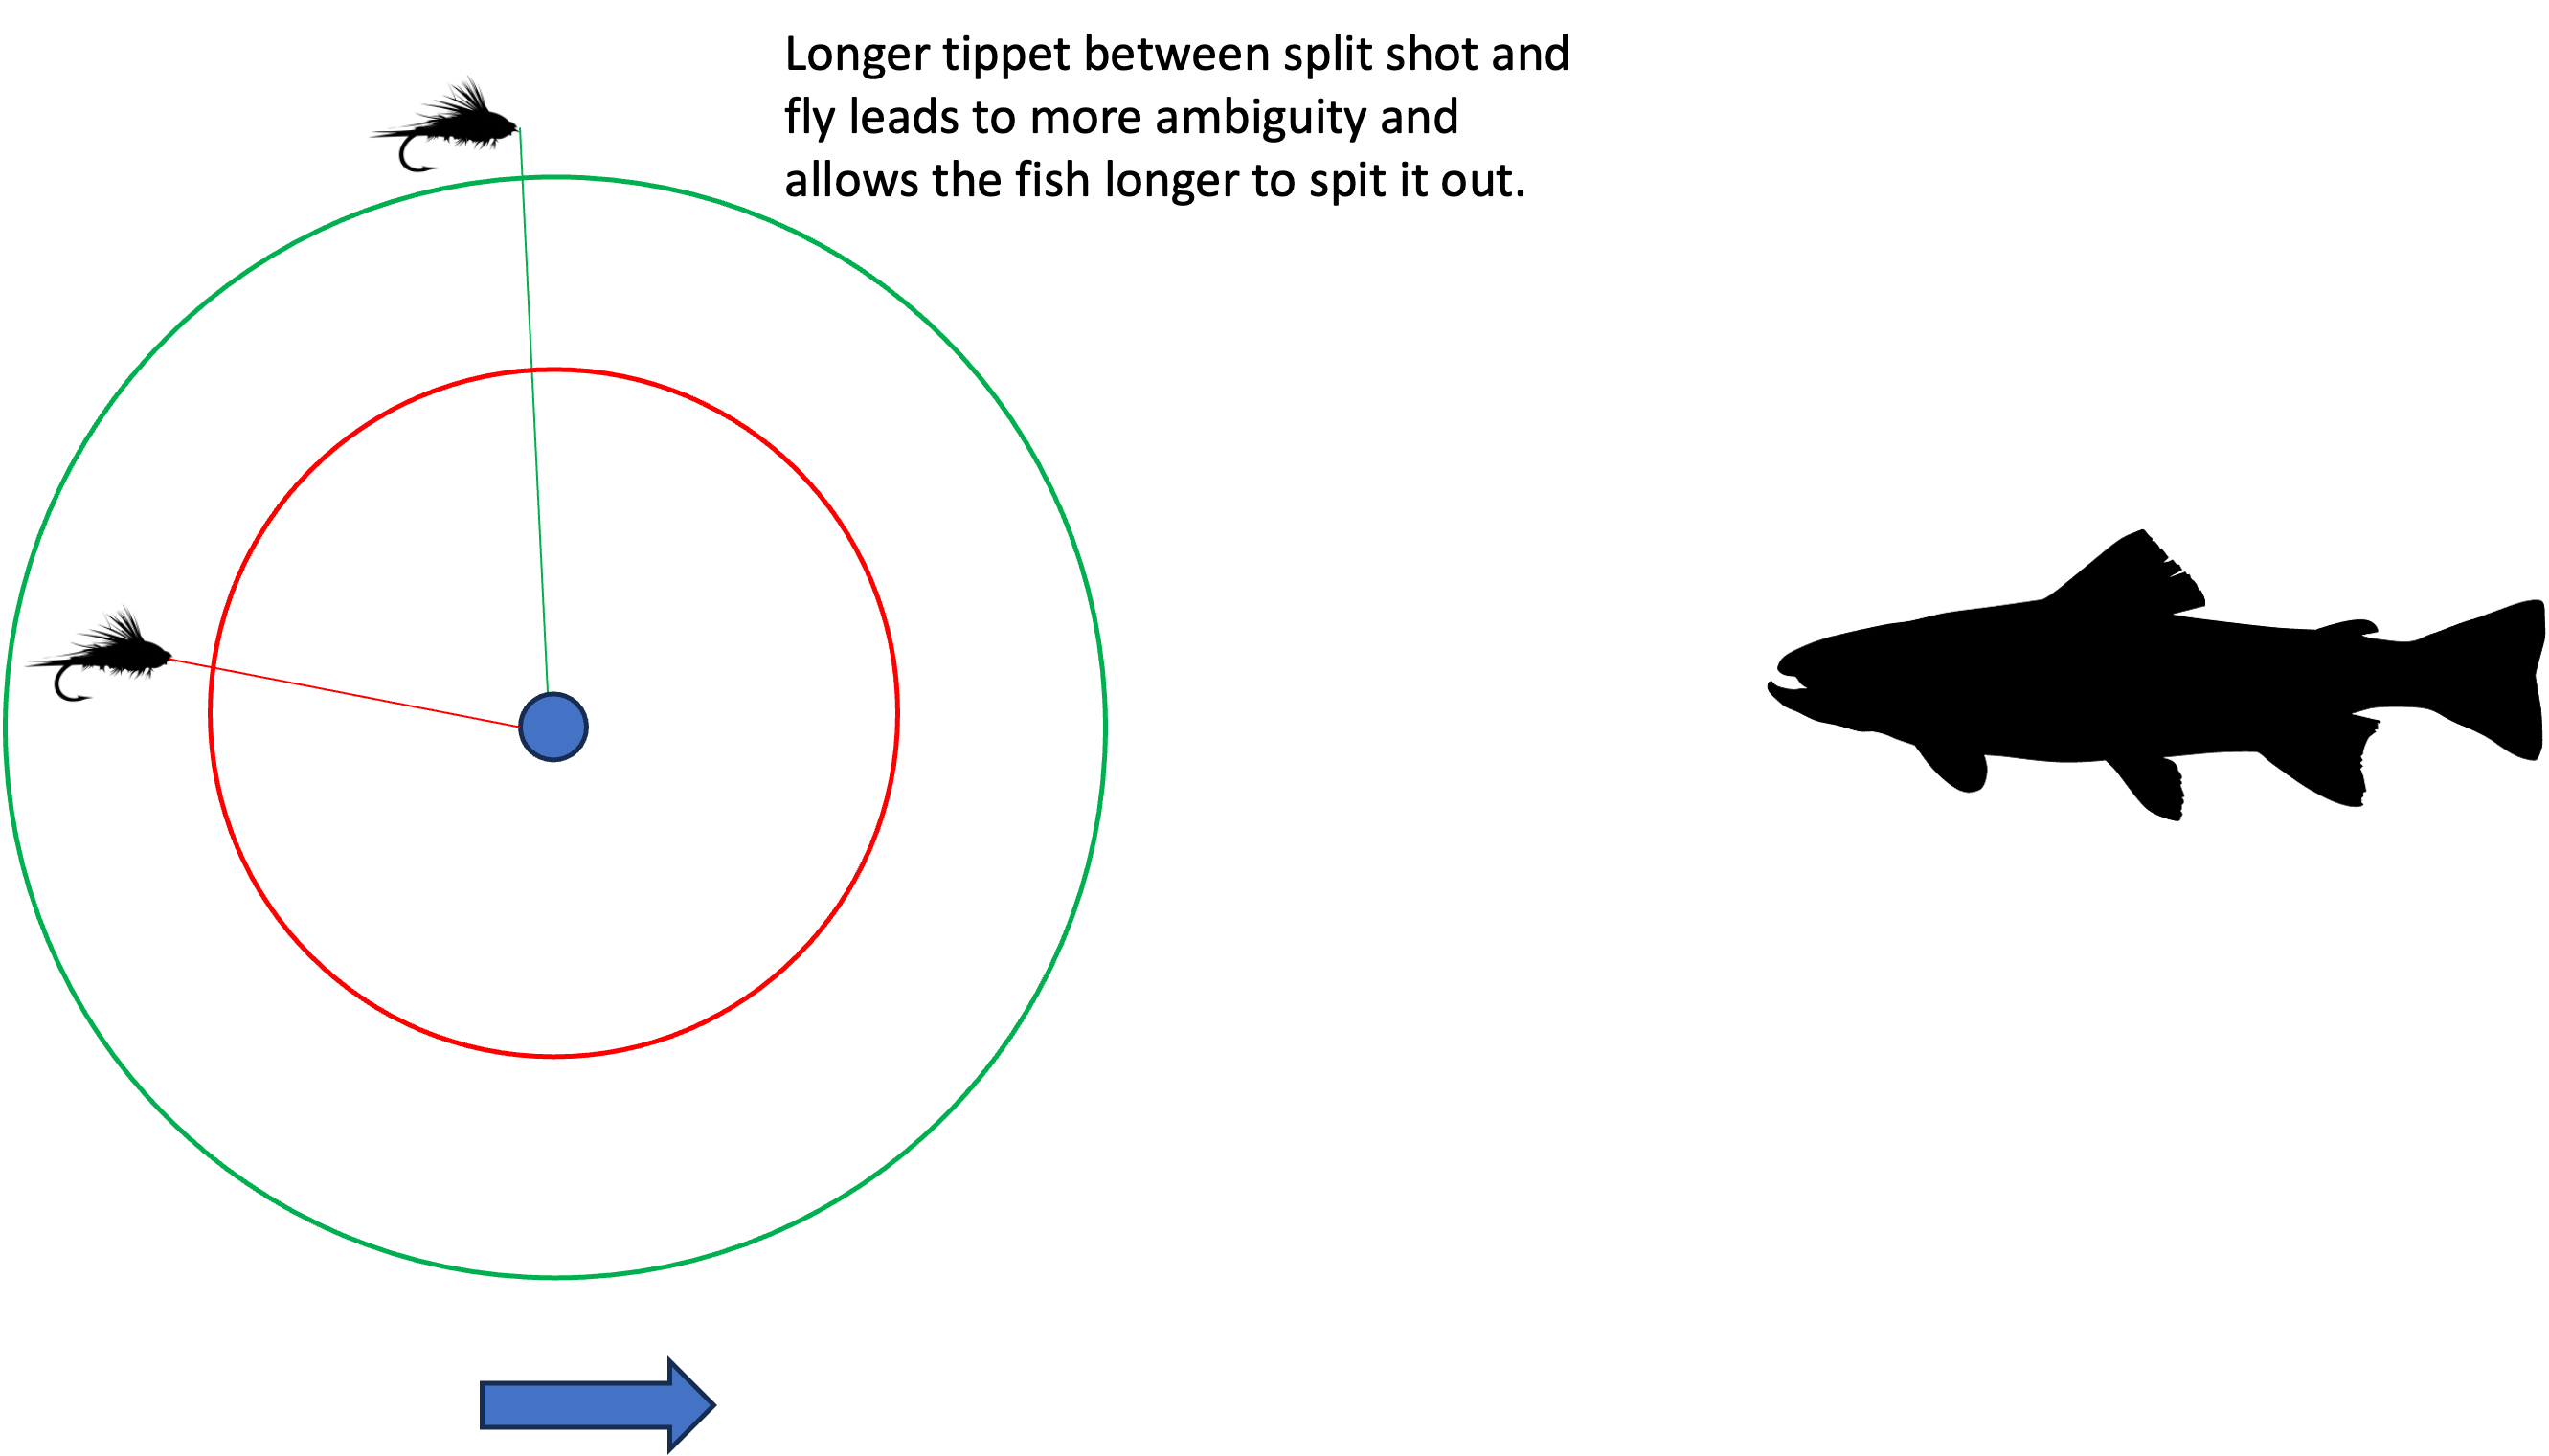
So I always took to fishing very short lengths of tippet between my fly and the split shot. Just enough to let the fly drift somewhat naturally. About 5-6 inches is enough. And I’ve caught fish in all types of water from roiling mountain rivers to crystal clear spring creeks doing this. Small split shot rarely affects fish, and the benefits far outweigh the disadvantages, if any.
Of course, if you’re fishing a bobber, you don’t need to change anything. All of the argument above still applies.
The other issue that arises is one of the position of the fly with respect to the split shot and the fish. In the picture below a fish taking the fly at A would have all sorts of time to spit it out before it ever moved or affected the anchor. The fish at B would have much less time.
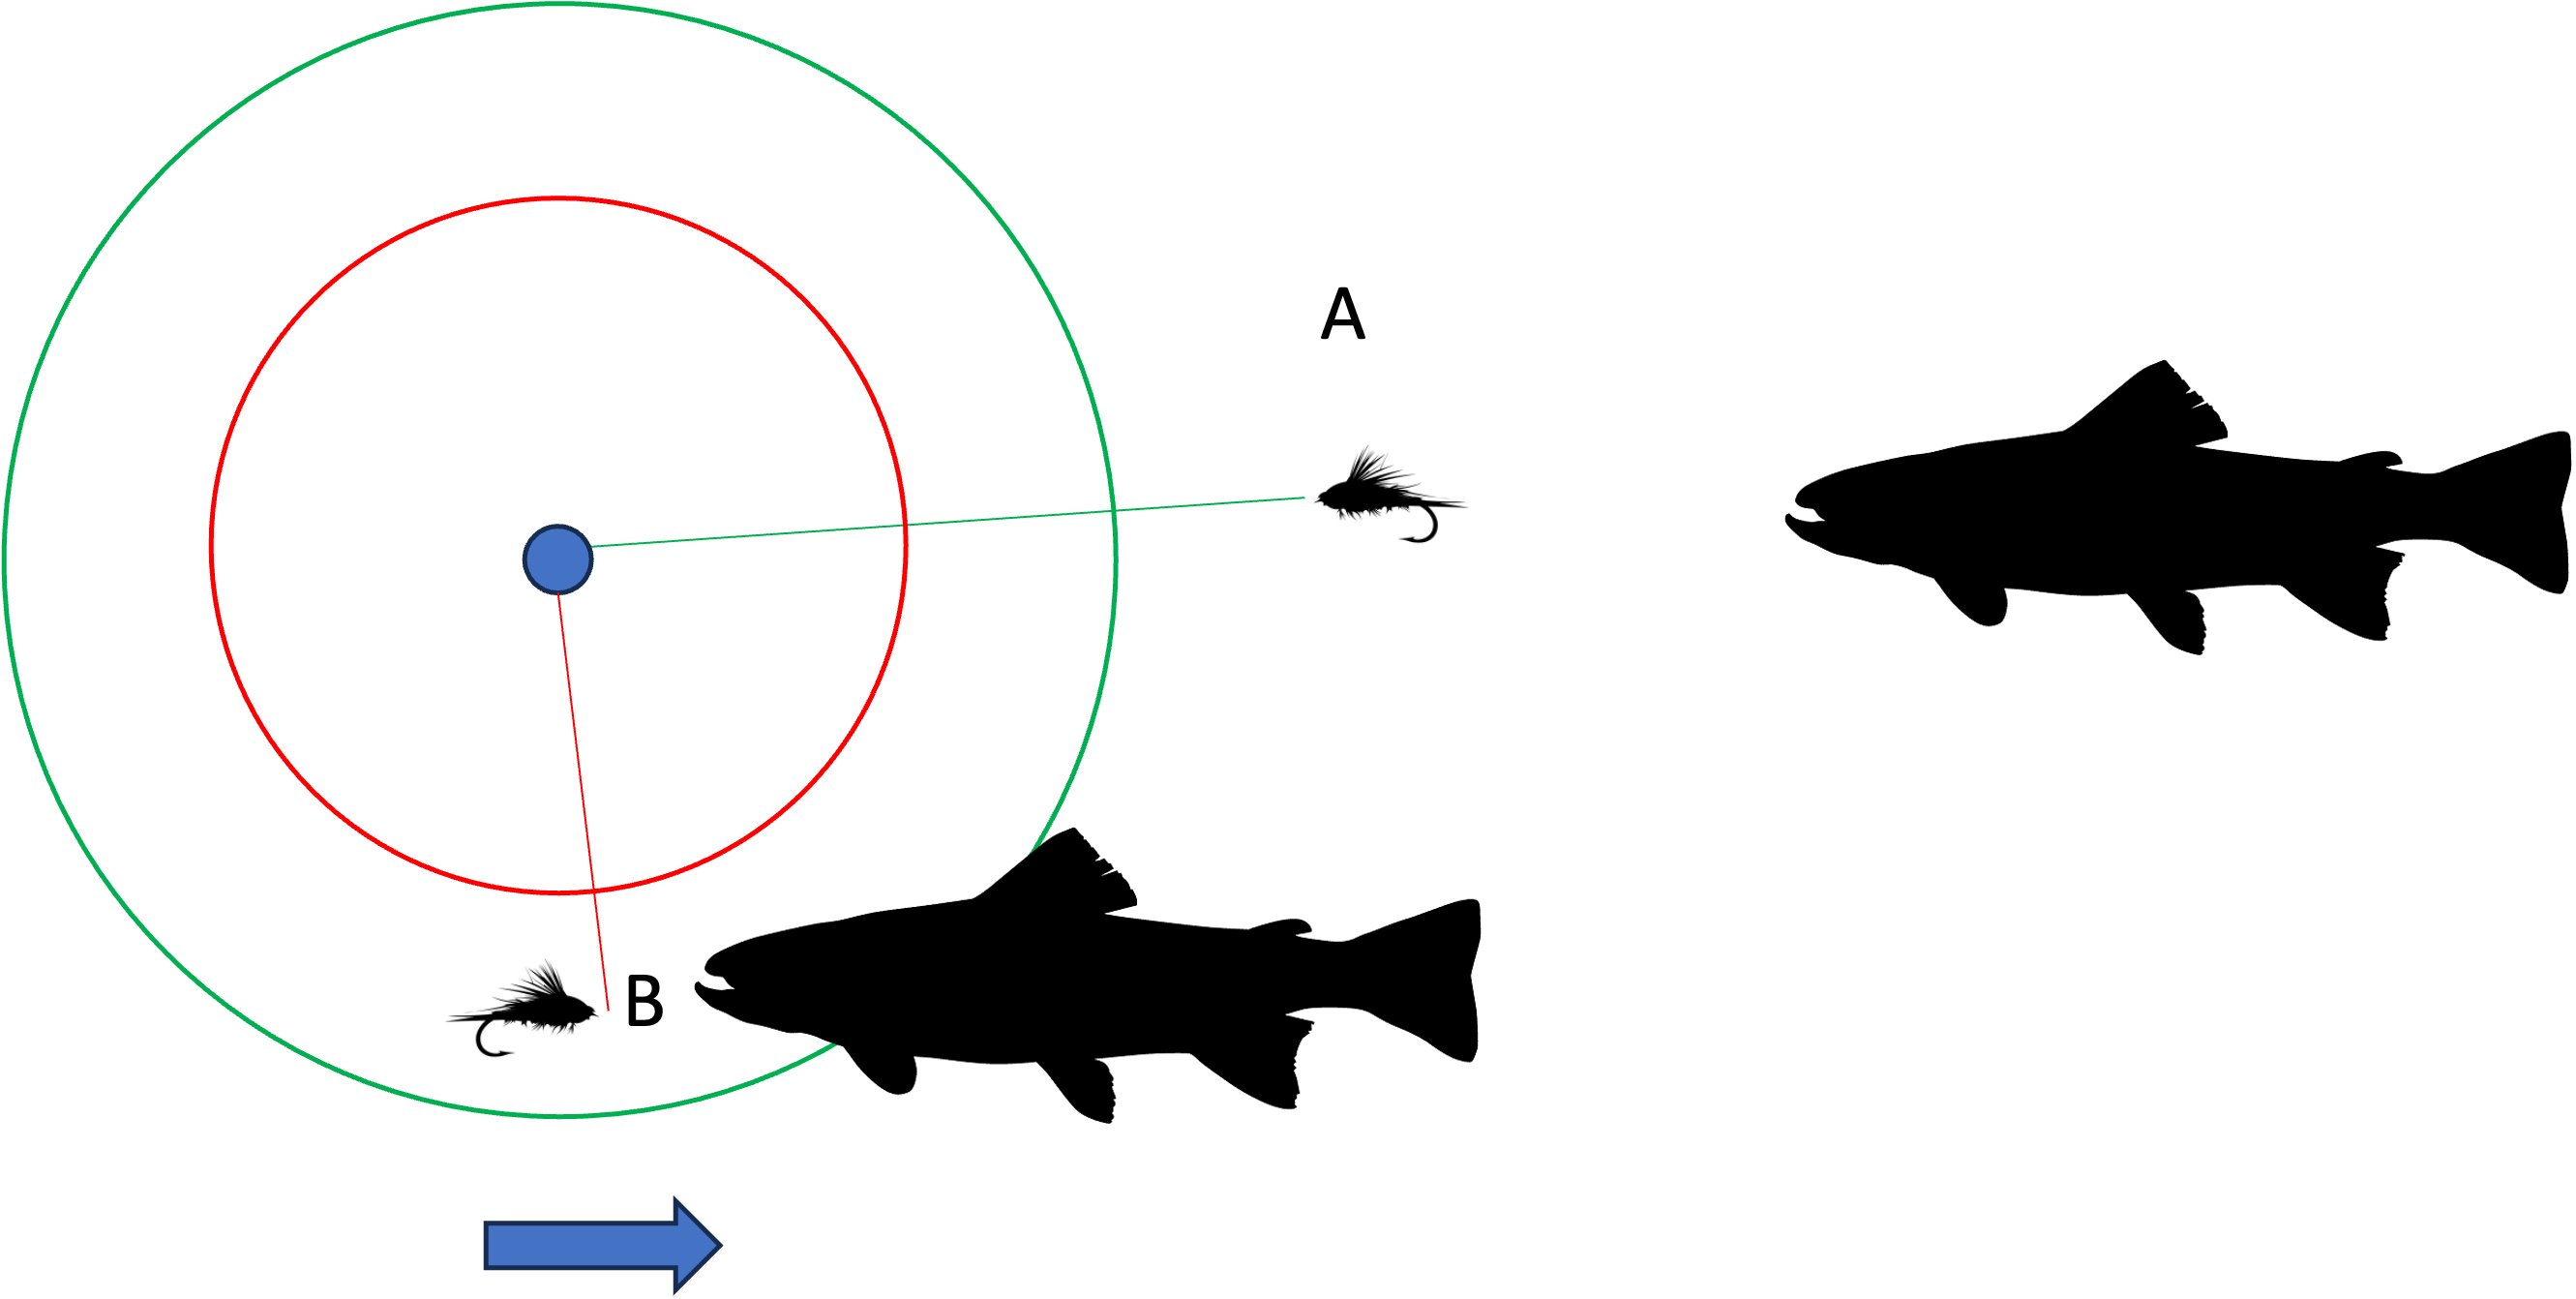
So, along with shortening the distance between the shot and the fly, also make sure that when you fish the rig the shot is close to, or ahead of the fly as it approaches fish. I often see folks making these long drifts downstream of themselves with a nymph hanging below an indicator. That’s really a very low percentage play. The highest percentage play is actually to fish the nymph as in B above. The split shot is out of the way of the fish and there’s a short trigger time.
I also see people rig their nymphs in a manner where they have several feet between the split shot and the nymph. This is troublesome for not just the reasons listed above, but also because it now requires inordinately long leaders. The anchor is still the shot, and that’s going to be what gets down. But the long tippet between the shot and the fly billows the fly above where the fish are.
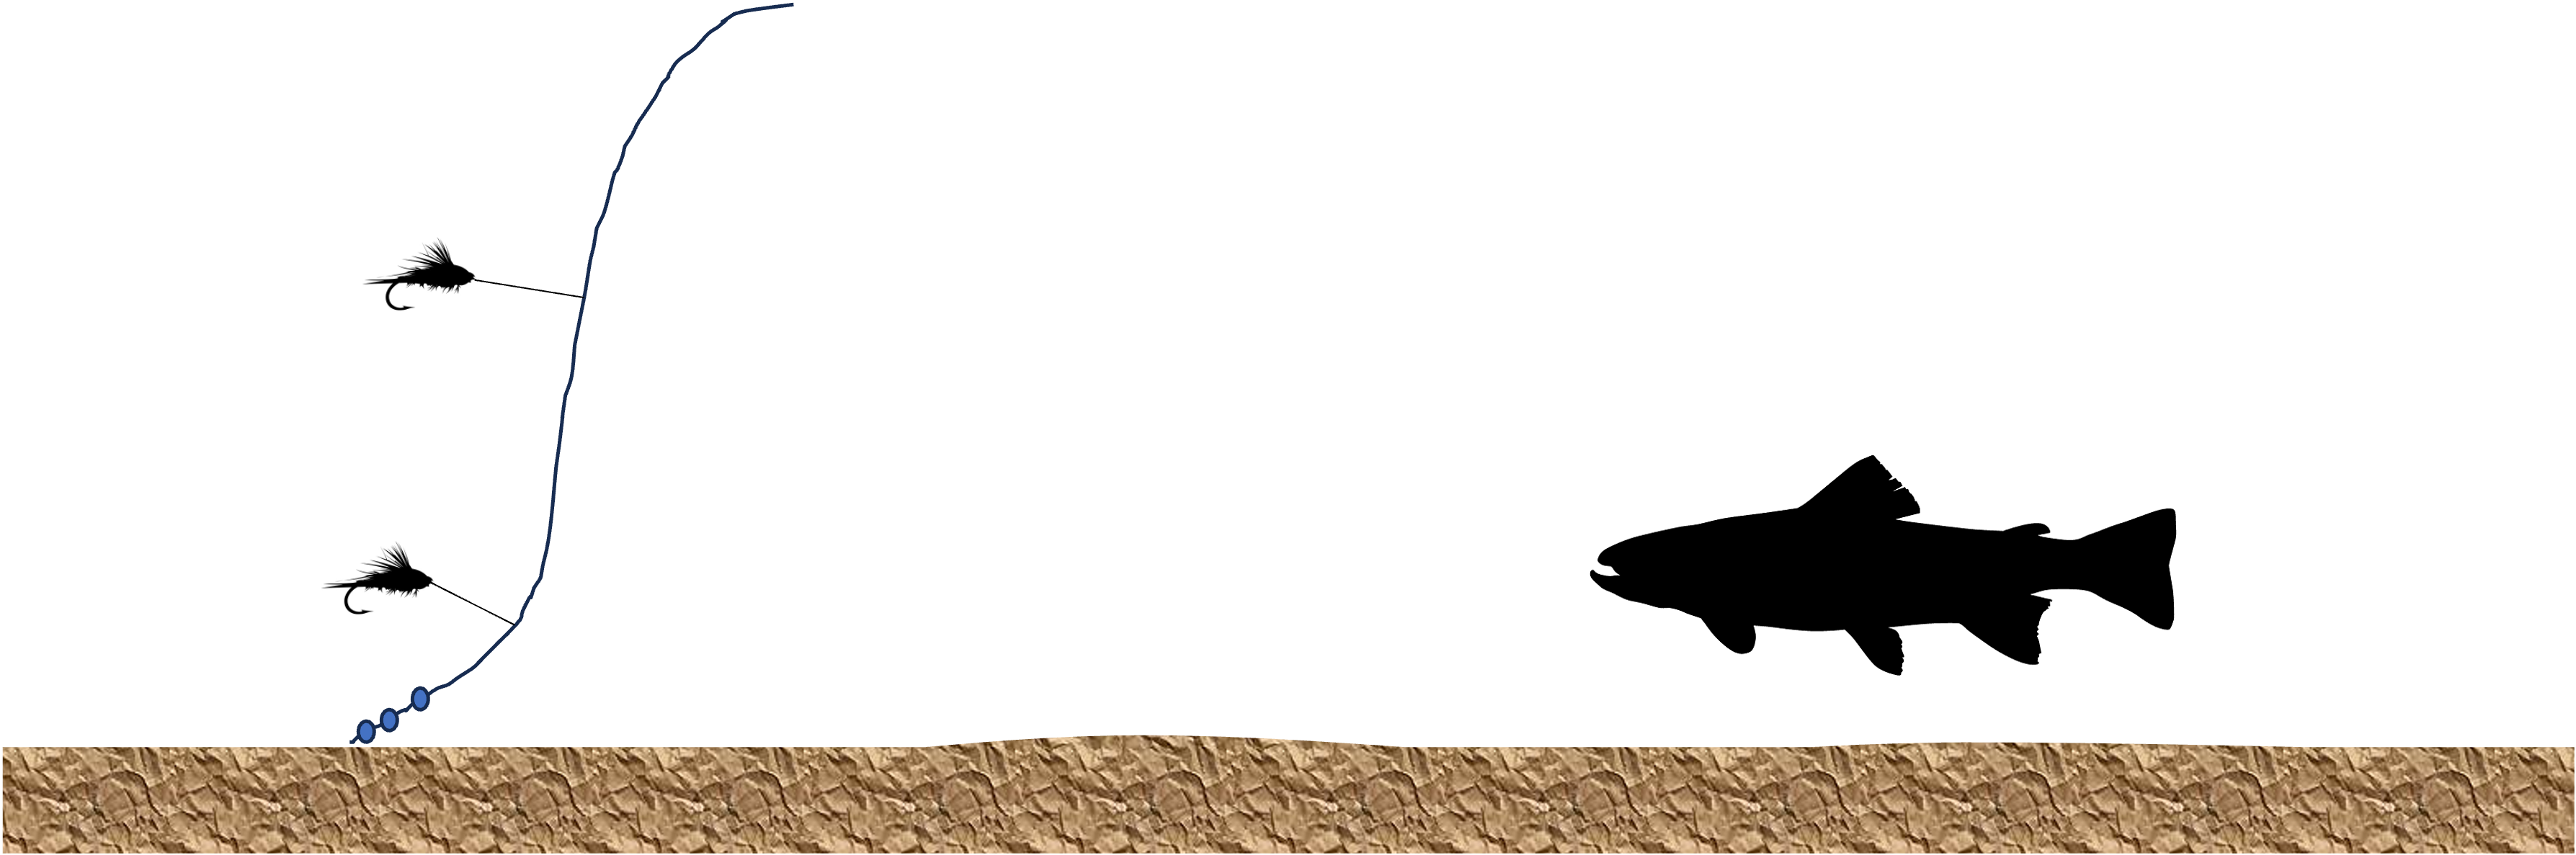
Multiple Flies and Split Shot
The same concept as above applies to a rig where you have multiple flies and are using split shot. Again, if you place your split shot above all your flies your tippet is relatively longer, leading to all the same issues as above. I like to put my split shot between the bottom two flies, as below.
Sometimes a bottom bouncing (or Utah) rig might be just the ticket. But again this rig is effective because of the short distance between the flies and the split shot. Again, try keep the split shot upstream or parallel to the flies. It will vastly improve your hook up rate.
Adding multiple smaller shot as opposed to one big one seems to snag a lot less. I suspect the chain of shot tend to pull each other past snags, a bit like the chains people use to slow down drifting boats. The chains don’t grab the bottom like a single anchor would. But I don’t know if that’s just speculation on my part.
Selecting Weights to Use
Split shot, bead heads or any other type of weight tends to sink faster as you increase the size of the shot. Here’s where the engineer in me gets the upper hand, so just bear with me for a bit. When you drop a sinking sphere into water there are two forces that act against it as it sinks. One is the difference between its mass and the mass of the water it displaces (the thing that led Archimedes to allegedly yell “Eureka.”). The other is the drag or friction that acts against the sphere as it sinks. The displacement is a matter of the volume of the body and the weight of the body and the displaced water grow at the same rate as you change the size. So that has no effect. But a very interesting thing happens with the drag. As you increase the size of the body its volume goes up like the cube of the radius while the surface area and so the drag goes like the square. So if we increase the radius from 1 to 2 the weight (which is what acts against the drag) increases by a factor of 8 while the area only increases by a factor 4. But the drag is a function of the velocity of the shot and at some stage all these forces come into balance and the shot doesn’t accelerate towards the bottom but sinks at a constant rate. This is the terminal velocity. So bigger shot or beads should sink flies better. And this is true in certain conditions. For example you might be better off fishing one 0.4 gm shot as opposed to two 0.2gm shots.
But I’ve noticed that this only works under very specific conditions - where the stream is relatively shallow. After a certain depth another issue comes into play.
The Maggot Rig
The English chalk streams, especially when they get a certain volume of water in them, are a lot deeper than their American counterparts - the spring creeks. Forty some years ago I first fished the River Test at a variety of spots around Stockbridge. What amazed me was the average depth of the river and the seeming mass of water flowing through it. Large chunks of the river seemed to flow through channelized sections that were 5-7 feet deep.
It was the kind of water where it’s awfully hard to get a nymph down to the fish. Another river like that is the South Holston in Tennessee. When the dam is generating (which is also when the fishing is best) large sections of the river are 5-9 feet deep. You often can’t see bottom and even large 24-inch fish disappear before they reach the bottom.
Flyfishermen have an incredibly hard time fishing these rivers with nymphs. The guides have them chucking a whole arsenal’s worth of lead. You can’t cast this mess, and just sort of flop the leader over and hope for the best.
But on that trip, 40 some years ago to Hampshire, I was out for a walk along the lower Avon one day and watched this guy fishing maggots for coarse fish. Once you got past the chumming and such it was interesting to see him fishing. I got to chatting with him and asked to see his rig, because he was getting perfect drifts with the maggot and didn’t seem to be chucking a lot of weight (the river there was fast and deep). His rig consisted of a float with a series of small shot strung down the line between the float and the bait. There were a couple of heavier ones up top.
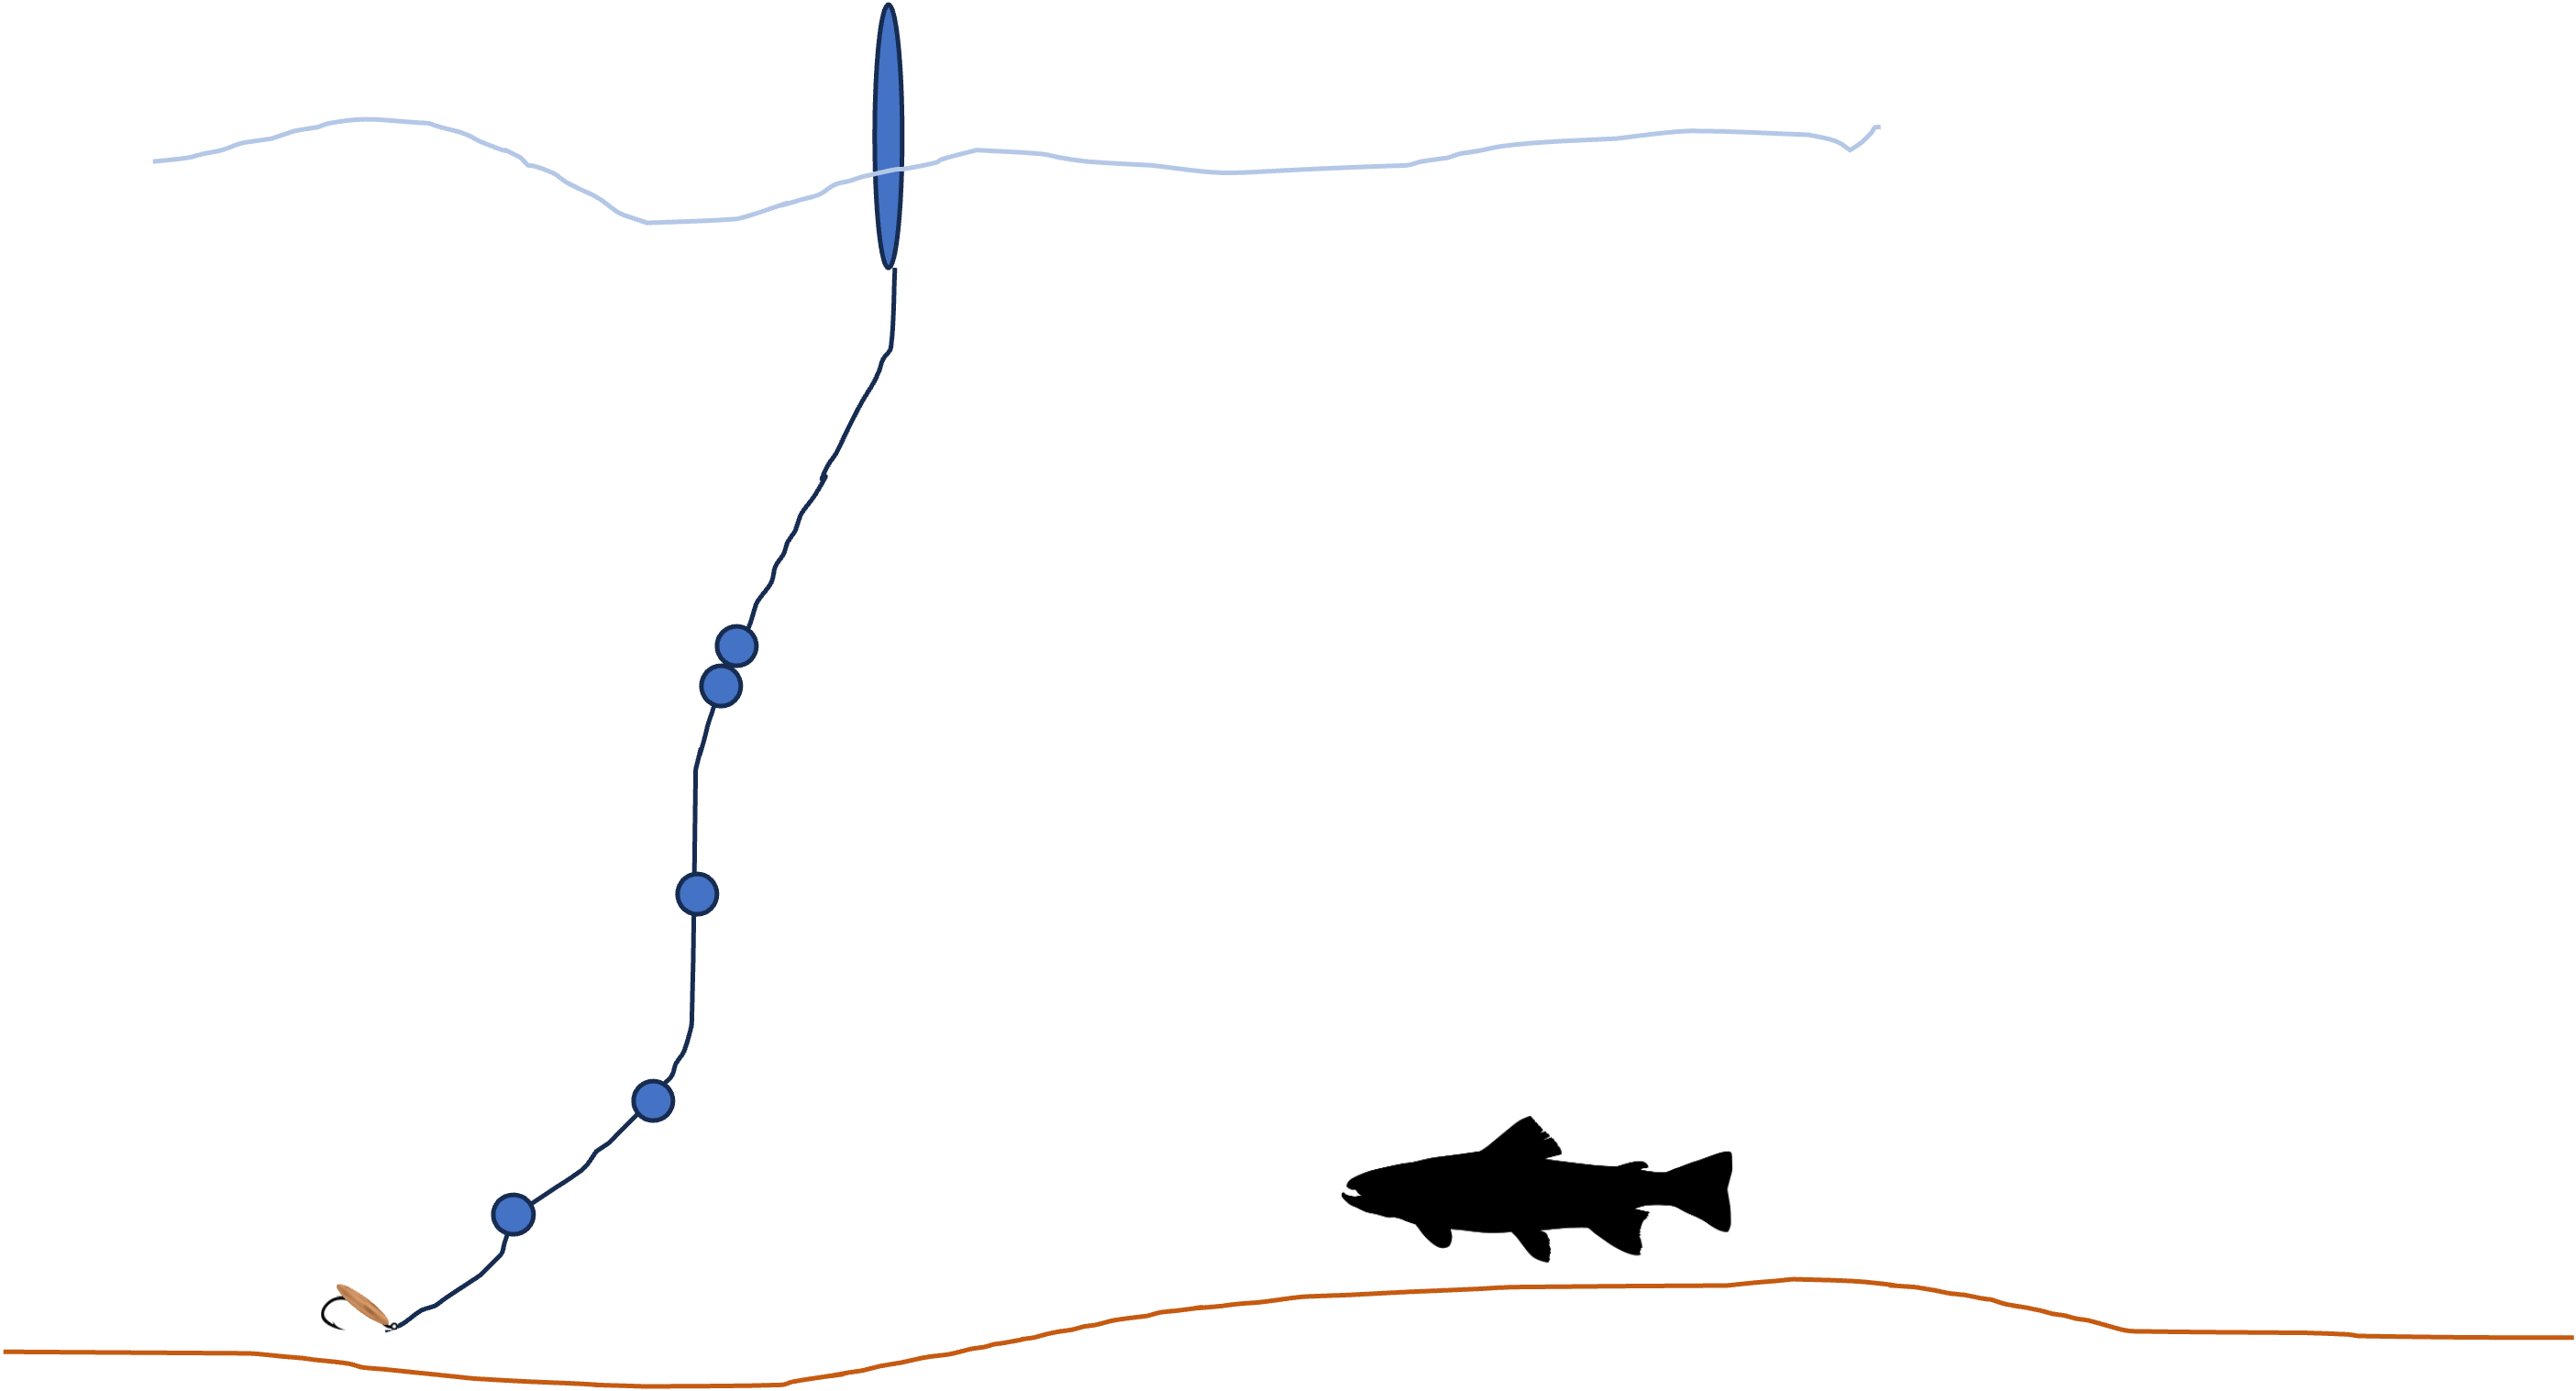
It was a sort of epiphany. Here’s what is going on. As the split shot settles towards the bottom it is impeded by a bunch of different forces. One of them is the relative bouyancy of the leader. The leader is much less dense than the split shot (Monofilament has a density of 1.1 g/cc while lead has a density of about 11 g/cc and tungsten about 19 g/cc). So a sinking piece of lead shot has about 10 times more force pulling it down than the leader does. This is one of the arguments for flourocarbon which is slightly denser. (I don’t think the cost, lack of tensile and knot strength make it worth the use, but that’s just me). The second reason is that the leader acts like a parachute, its drag tending to slow the descent of the fly. The third problem is the actual flow of the water. The water tends to flow slowest at the bottom of the stream and fastest towards the surface.
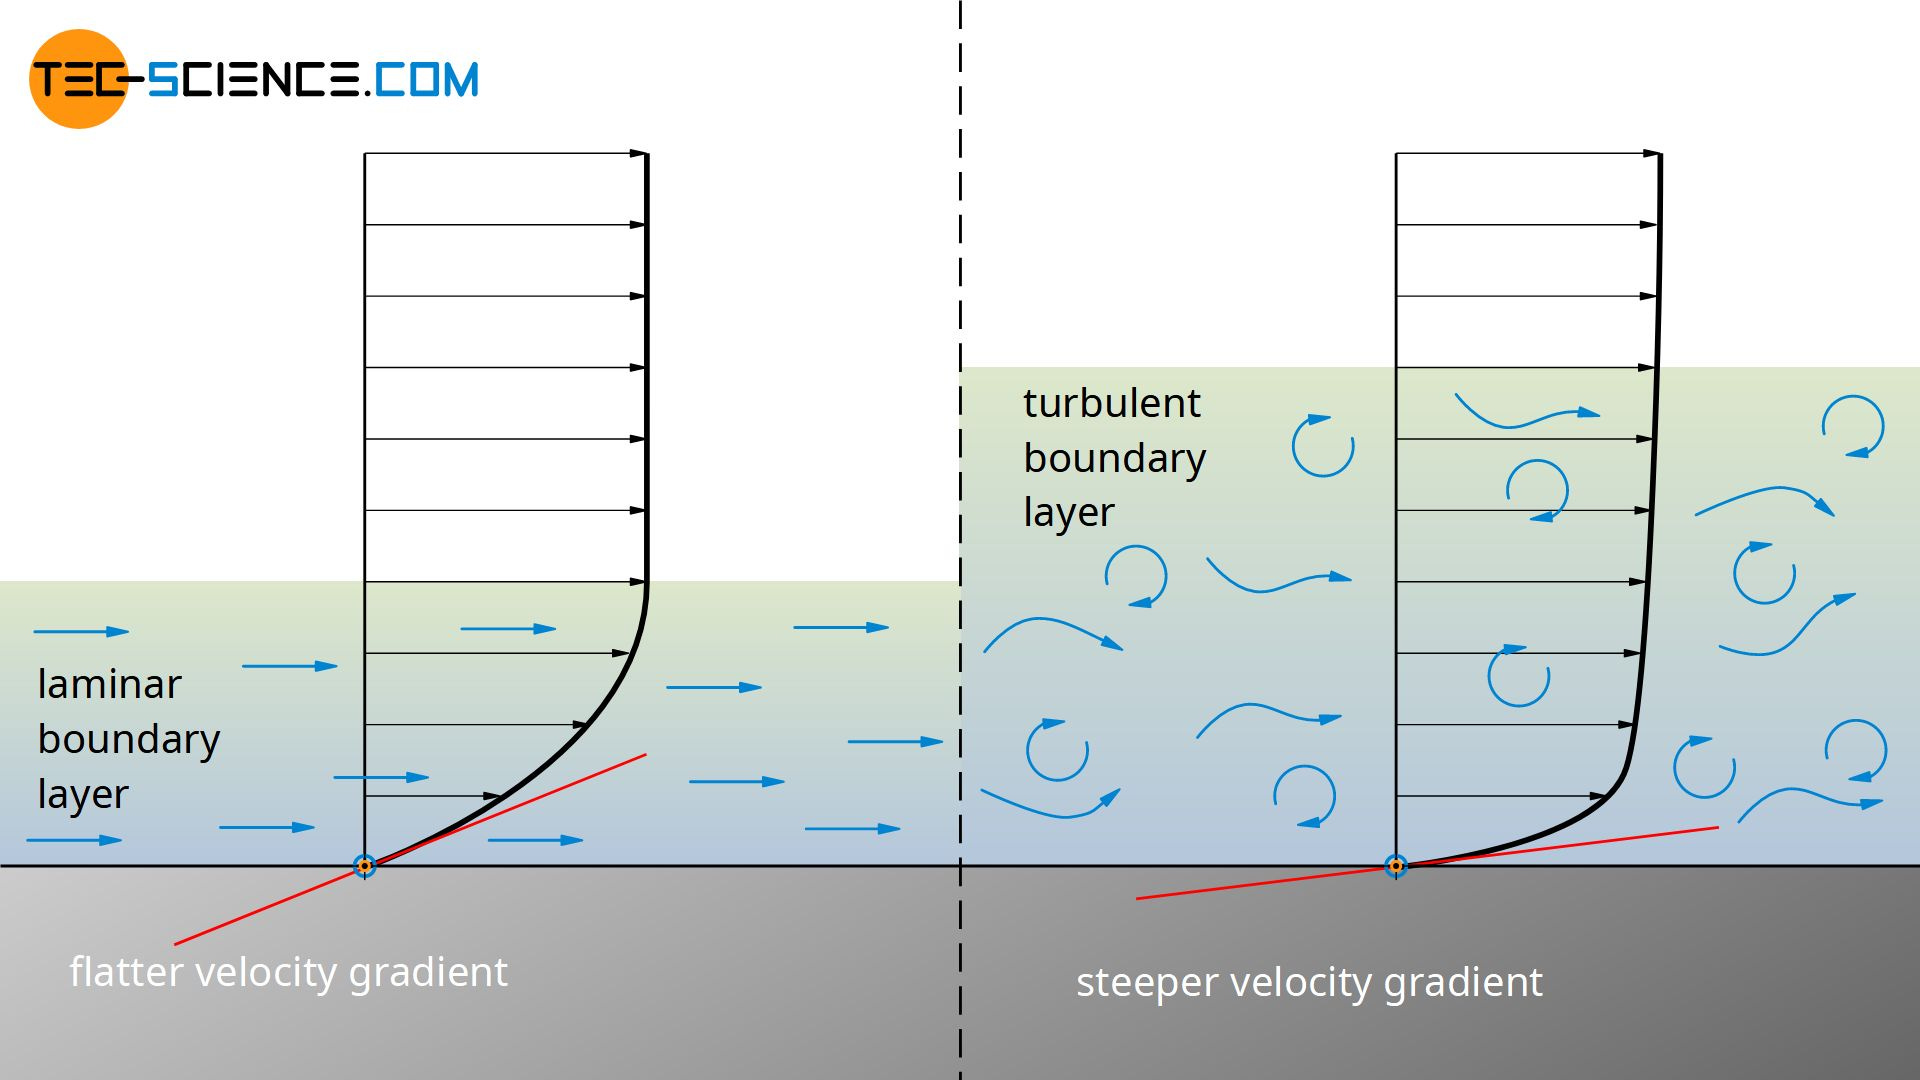
As the leader sinks the parts closer to the surface get dragged along faster than the portions deeper down tending to pull the fly upwards. This is also why you should fish the lightest tippet you can get away with.
What the guy fishing maggots on the Avon was doing was addressing all these issues. He had the most weight up top so that he got a sharper angle down through the top of the water. This reduced the amount of line affected by the fastest water. He had shot strung out along the line so that the portion of line that acted as a parachute for each piece of shot was just the line between one shot and the bit above it. This seemed genius and I couldn’t wait to try it. But I had to wait to get home. Back in those days they’d have tarred, feathered and carried me out on a rail if I started throwing shot into their vaunted chalk streams. I now standardly fish what I call the maggot rig. On rivers like the South Holston it’s nothing to see people throwing 4, 5 or even 6 BB shot when they are generating at the dam. I can fish the same water with a rig that has one #1, one #4 and two or three #6 shot.
You can actually get away with 1/3 or 1/4 of the overall weight on the leader and the fact that it’s strung out along a longer length makes it easier to cast as opposed to a huge chunk of lead whizzing around like an angry hornet.
Bead Heads and Weighted Flies
The grandfather of all weighted nymphs is Frank Sawyer’s Pheasant Tail. A fly that works just as wonderfully today as the day it was first tied. It’s a shame that it’s rarely dressed in the original manner around here. I love it, and fish it constantly.
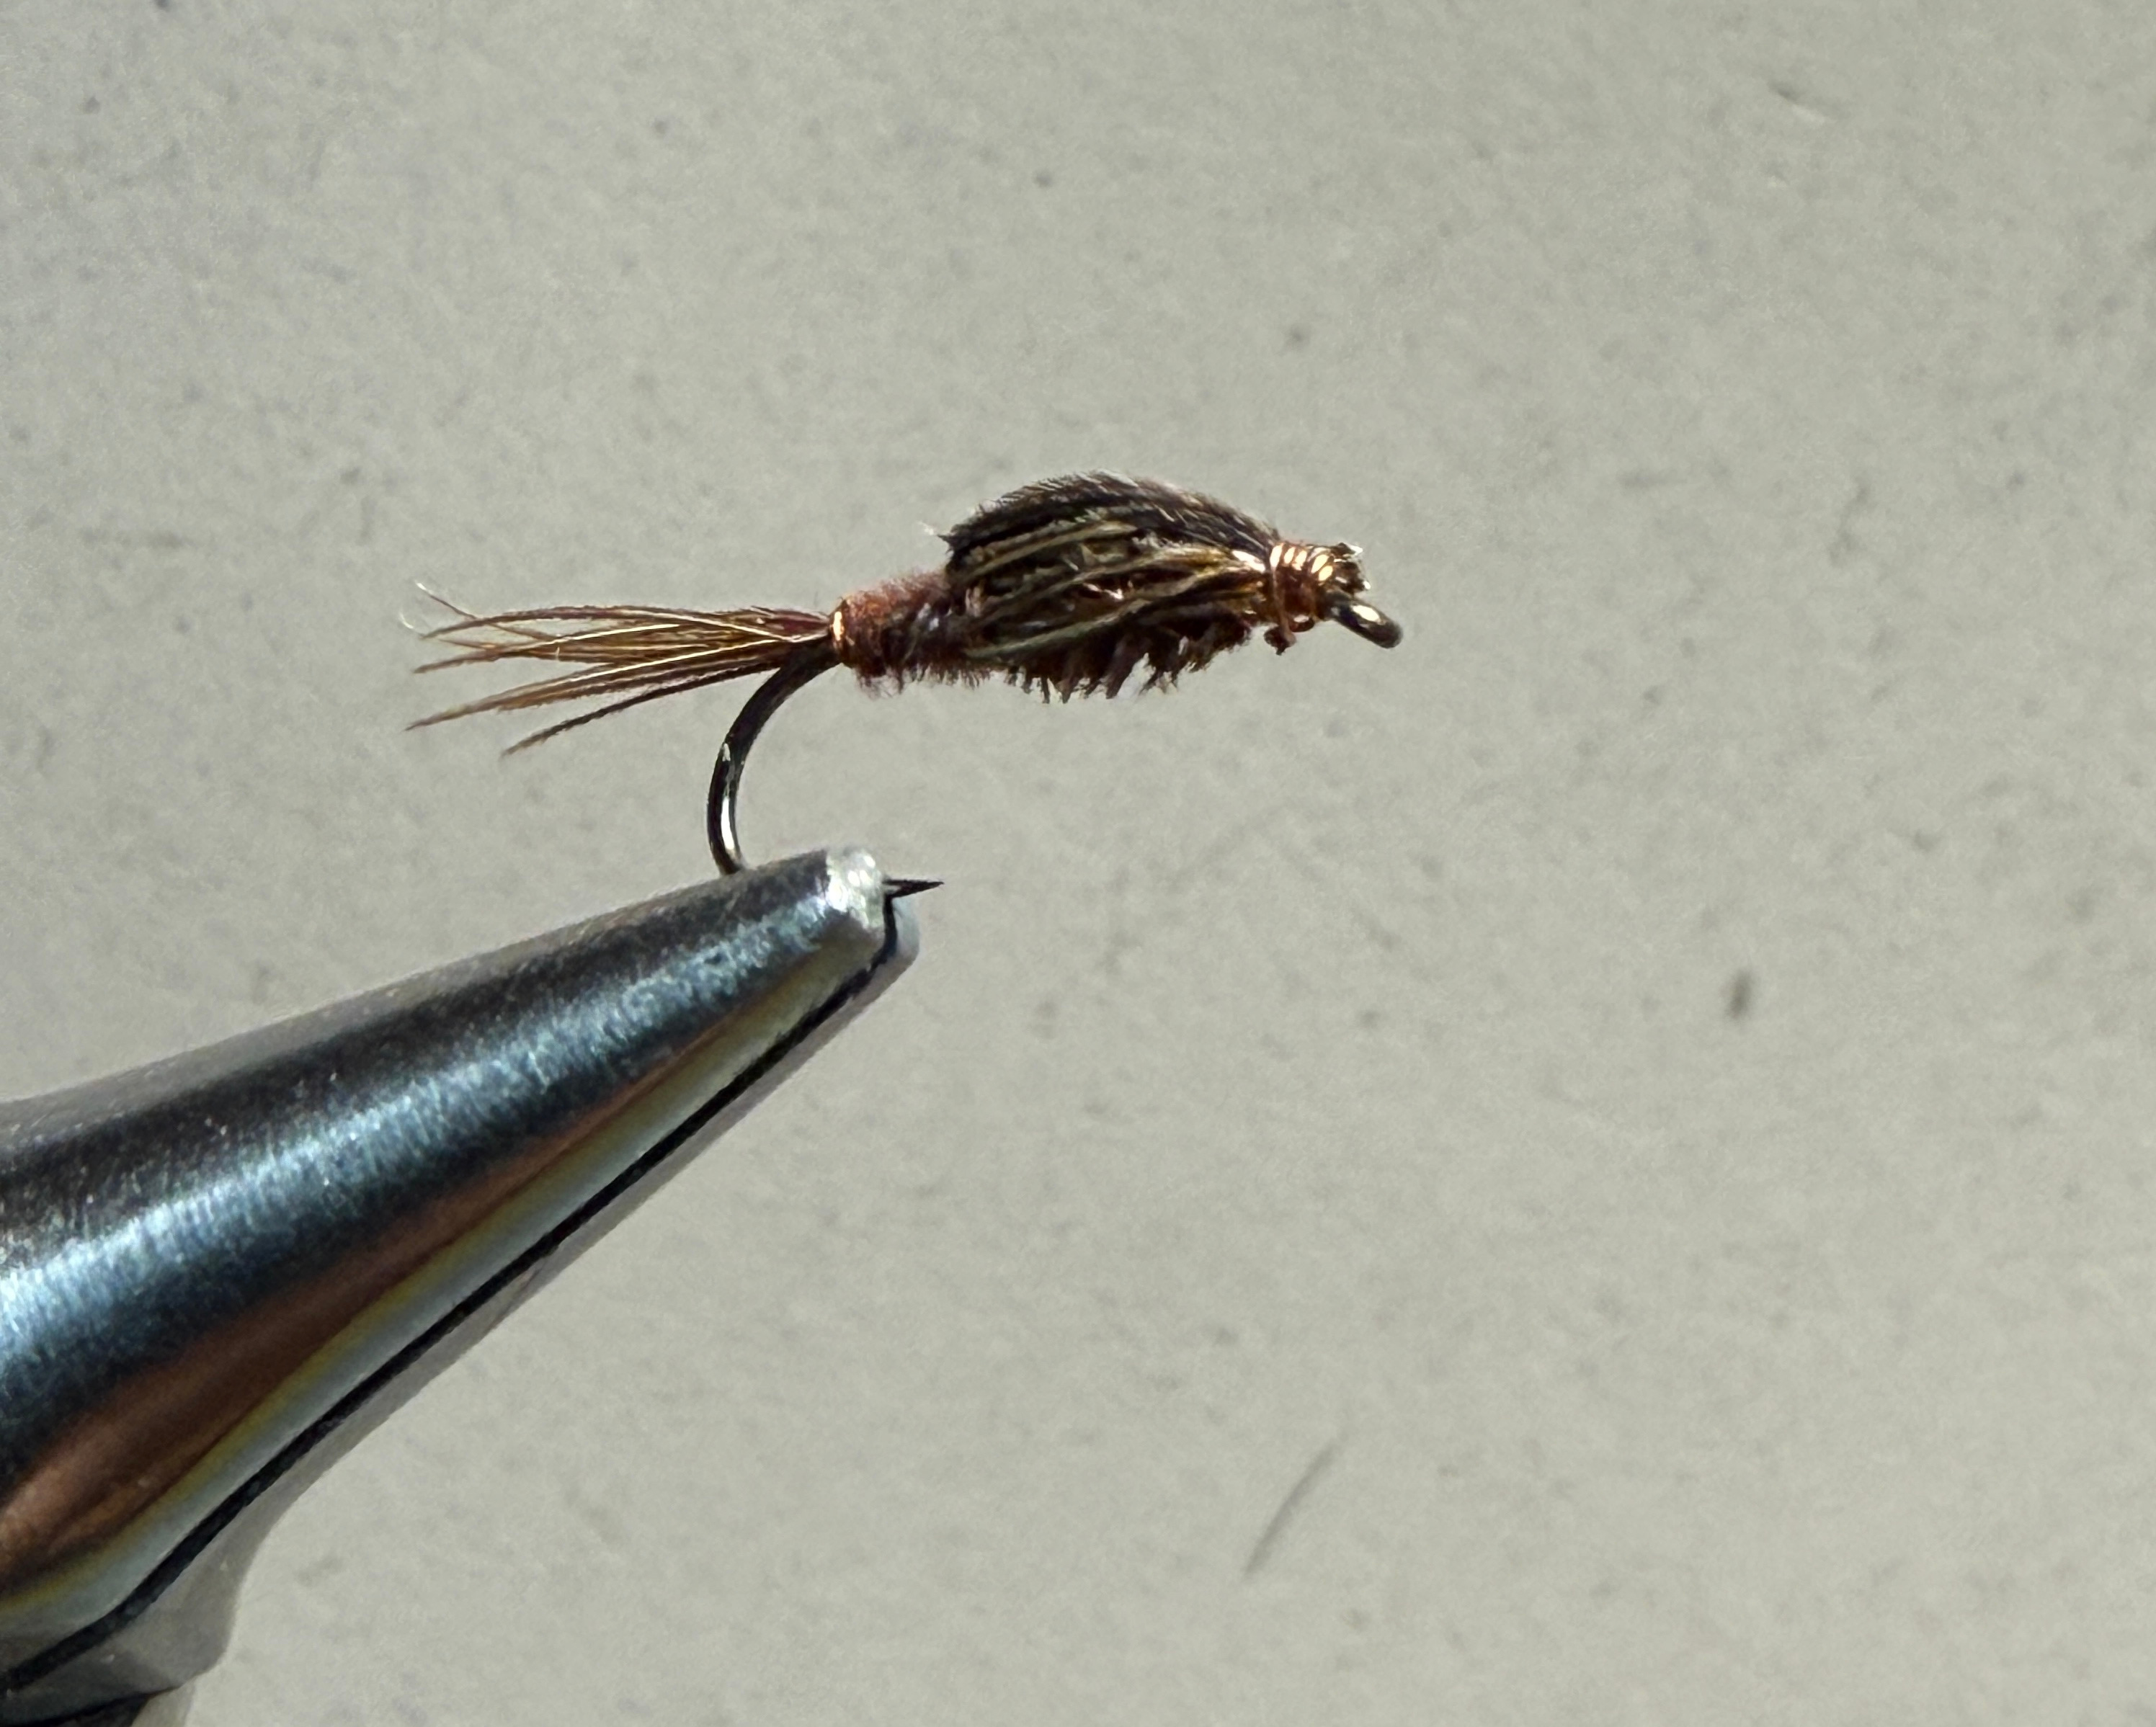
The fly is constructed entirely of two materials - the pheasant tail fibers and copper wire. No thread is used and the thorax is a ball of copper wire. Sawyer invented his fly on the same Avon on which I saw the guy fishing the maggots, albeit many miles upstream. But his water still had those deeper channelized sections so characteristic of English chalk streams. This fly, fished on a light tippet gets down reasonably well. But of course a weighted fly is the concept of moving the split shot close to the fly carried to its limit. People fishing 2 or 3 weighted flies on their leader are now mimicking the “maggot rig” without knowing it. I’m also convinced this is what leads to the success of Czech or Euro nymphing rigs. It’s starts with the fact that the weight is closer to the fly. And of course they stop letting the fly get downstream of the leader by the way they fish it.
Dry Dropper Rigs
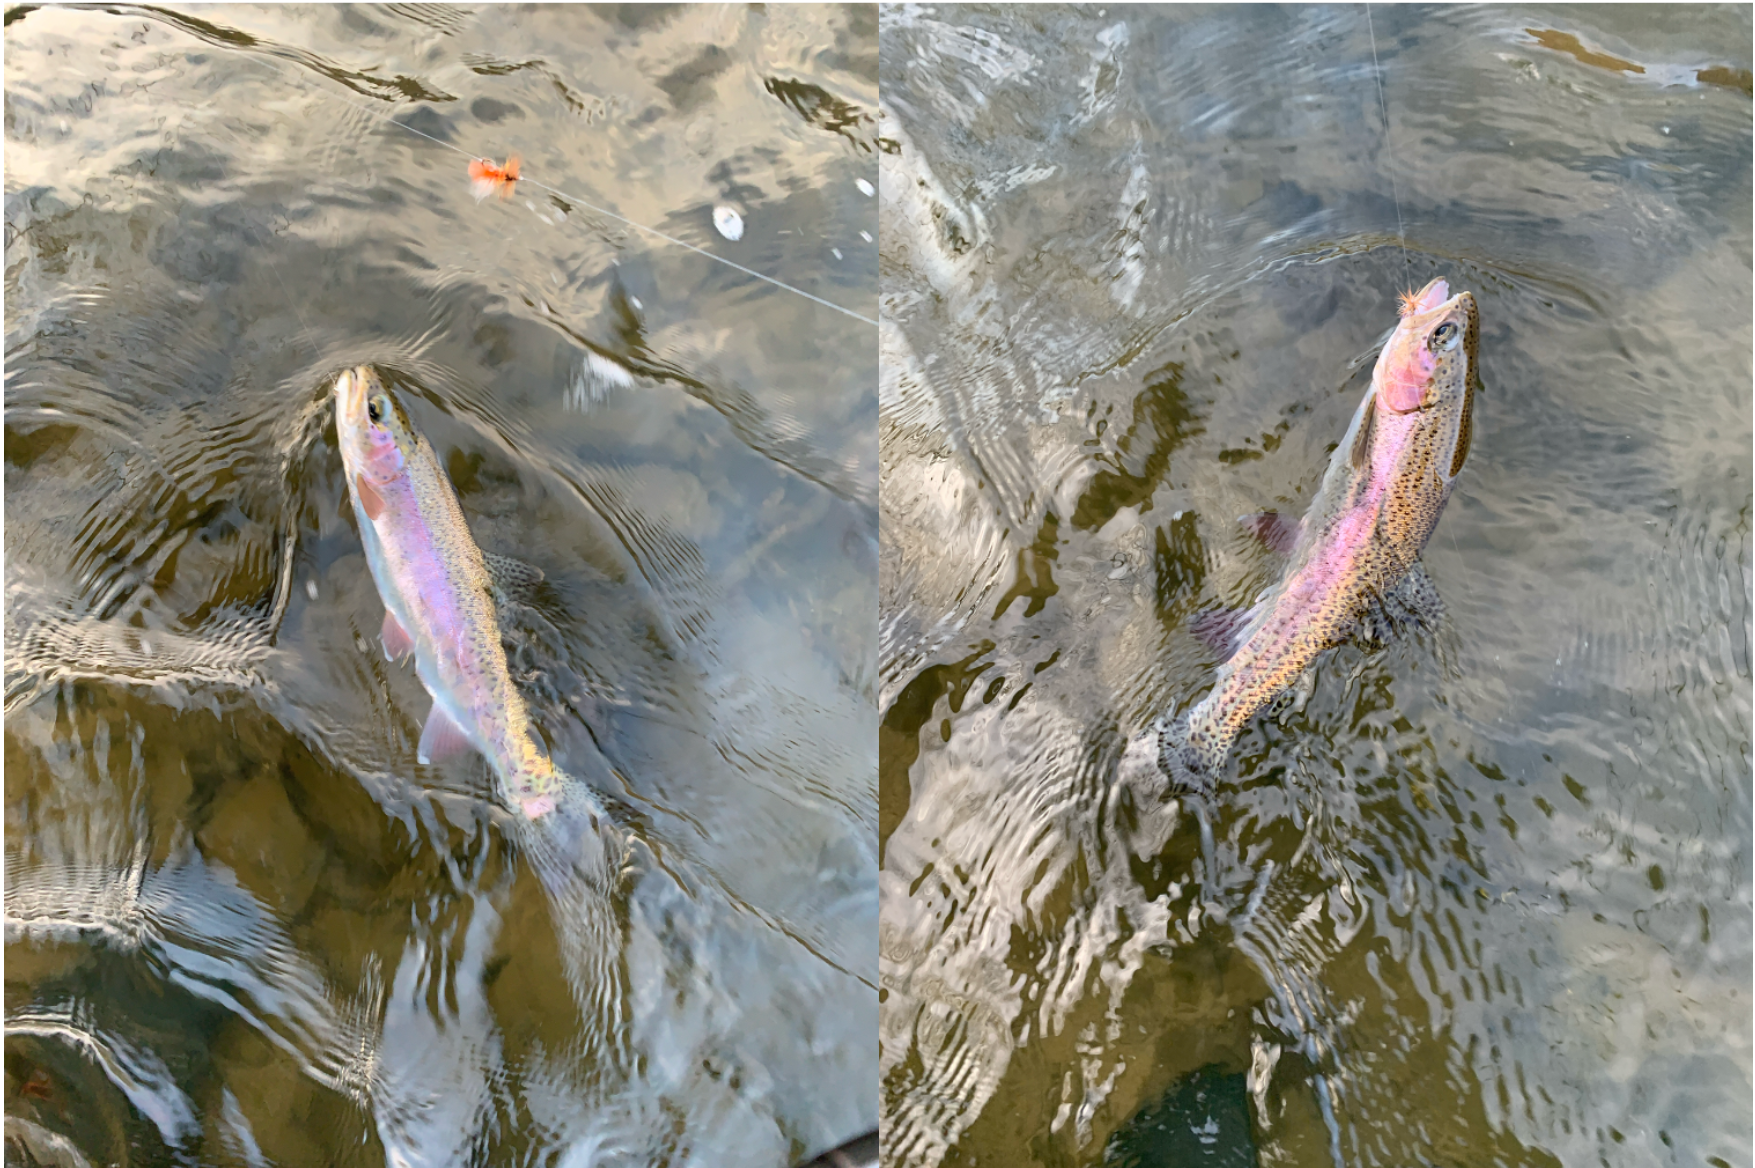
A tale of two rainbows caught on the same rig. The one on the left ate a nymph on a dropper and the one on the right ate the dry on the same rig. This is why the dry dropper rig is my absolute favorite way to fish nymphs. I tend to fish the dry dropper rig more often than any other kind of nymph set up. It doesn’t matter whether I’m fishing a little stream of the mighty Colorado.

Once you come to accept that you don’t need a ton of weight to get your flies to the bottom the dry dropper rig becomes a great option. Especially if you’re willing to fish more than one fly on the dropper. Go to a set of bead heads and you have a version of the “maggot rig.” A 3/32” bead is somewhere between a #6 and #4 lead shot. Three of those will sink down to all sorts of depths when strung up about 9-12” apart on the leader. It doesn’t take that much to hold a dry fly up either. I’ll standardly fish 3 such nymphs below a size 14 dry on smaller water. Bigger water allows you to get longer drifts giving the nymphs more time to sink.
But you have to give the nymphs enough tippet to sink. I see people hang a nymph about a foot below a dry. And that might work in some places, but I state the obvious that such a rig can’t sink more than a foot unless your dry goes down too. Your dry dropper rig should have the same amount of tippet below the dry as you would have below an indicator fished at that spot. The tippet between the dry and the nymphs must have enough slack to sink the flies and not pull the dry down, and yet not be long enough to make it impossible or difficult to detect a take.
I learned a trick from my buddy Matt Murphy fishing to midging fish in slick water. Hanging a couple of bead headed midge larva or pupa below a Griffith’s Gnat makes for a dynamite combination. That’s right, we’re fishing a couple of tungsten bead headed flies below a size 22-24 Griffith’s gnat. You just have to have the faith and fortitude to try it.
Strike Indicators
Strike indicators, bobbers, bungs or whatever you call them are both a great boon to, and the bane of many a fly fishermen. Obviously if you’re a guide stuck with novice anglers nothing beats hanging a couple of nymphs below a Thingamabobber and rowing the boat over likely mid-river lies. It’ll catch fish. Maybe not many, maybe not the best, but enough. In certain light conditions where seeing the leader is difficult a strike indicator can be indispensable. Just as it sometimes is for old fogies like me with fading eyesight. And they do make stack mending easier. But for the most part the best role for a strike indicator is what my friend, Jay Peck, calls a drift management device. Once you start relying too heavily on the strike indicator for detecting takes your success rate will go down.
The first reason, I believe, is that you become hyper-focused on the indicator. Often the indication of a fish taking you fly is noticing a peculiar movement or, what GEM Skues called the “little white blink”, the flash of the trout’s mouth as it takes your fly. A broader view of the area your fly is drifting through, that includes your leader will catch you more fish.
The second reason is that in order to be effective one must constantly adjust the distance between the indicator and the flies/anchor. That distance should be somewhere around 1.5x of the water depth for normal runs, going longer or shorter based on water depth, speed of flow etc. If you don’t do that you will miss a lot of strikes.
Lastly, too many people have a tendency to rely on a strike indicator to willy nilly float their fly downstream, below their position. Be very careful when you do this. Remember for a strike indicator to be effective it must either be downstream of the nymph, or close enough that a strike is detectable.
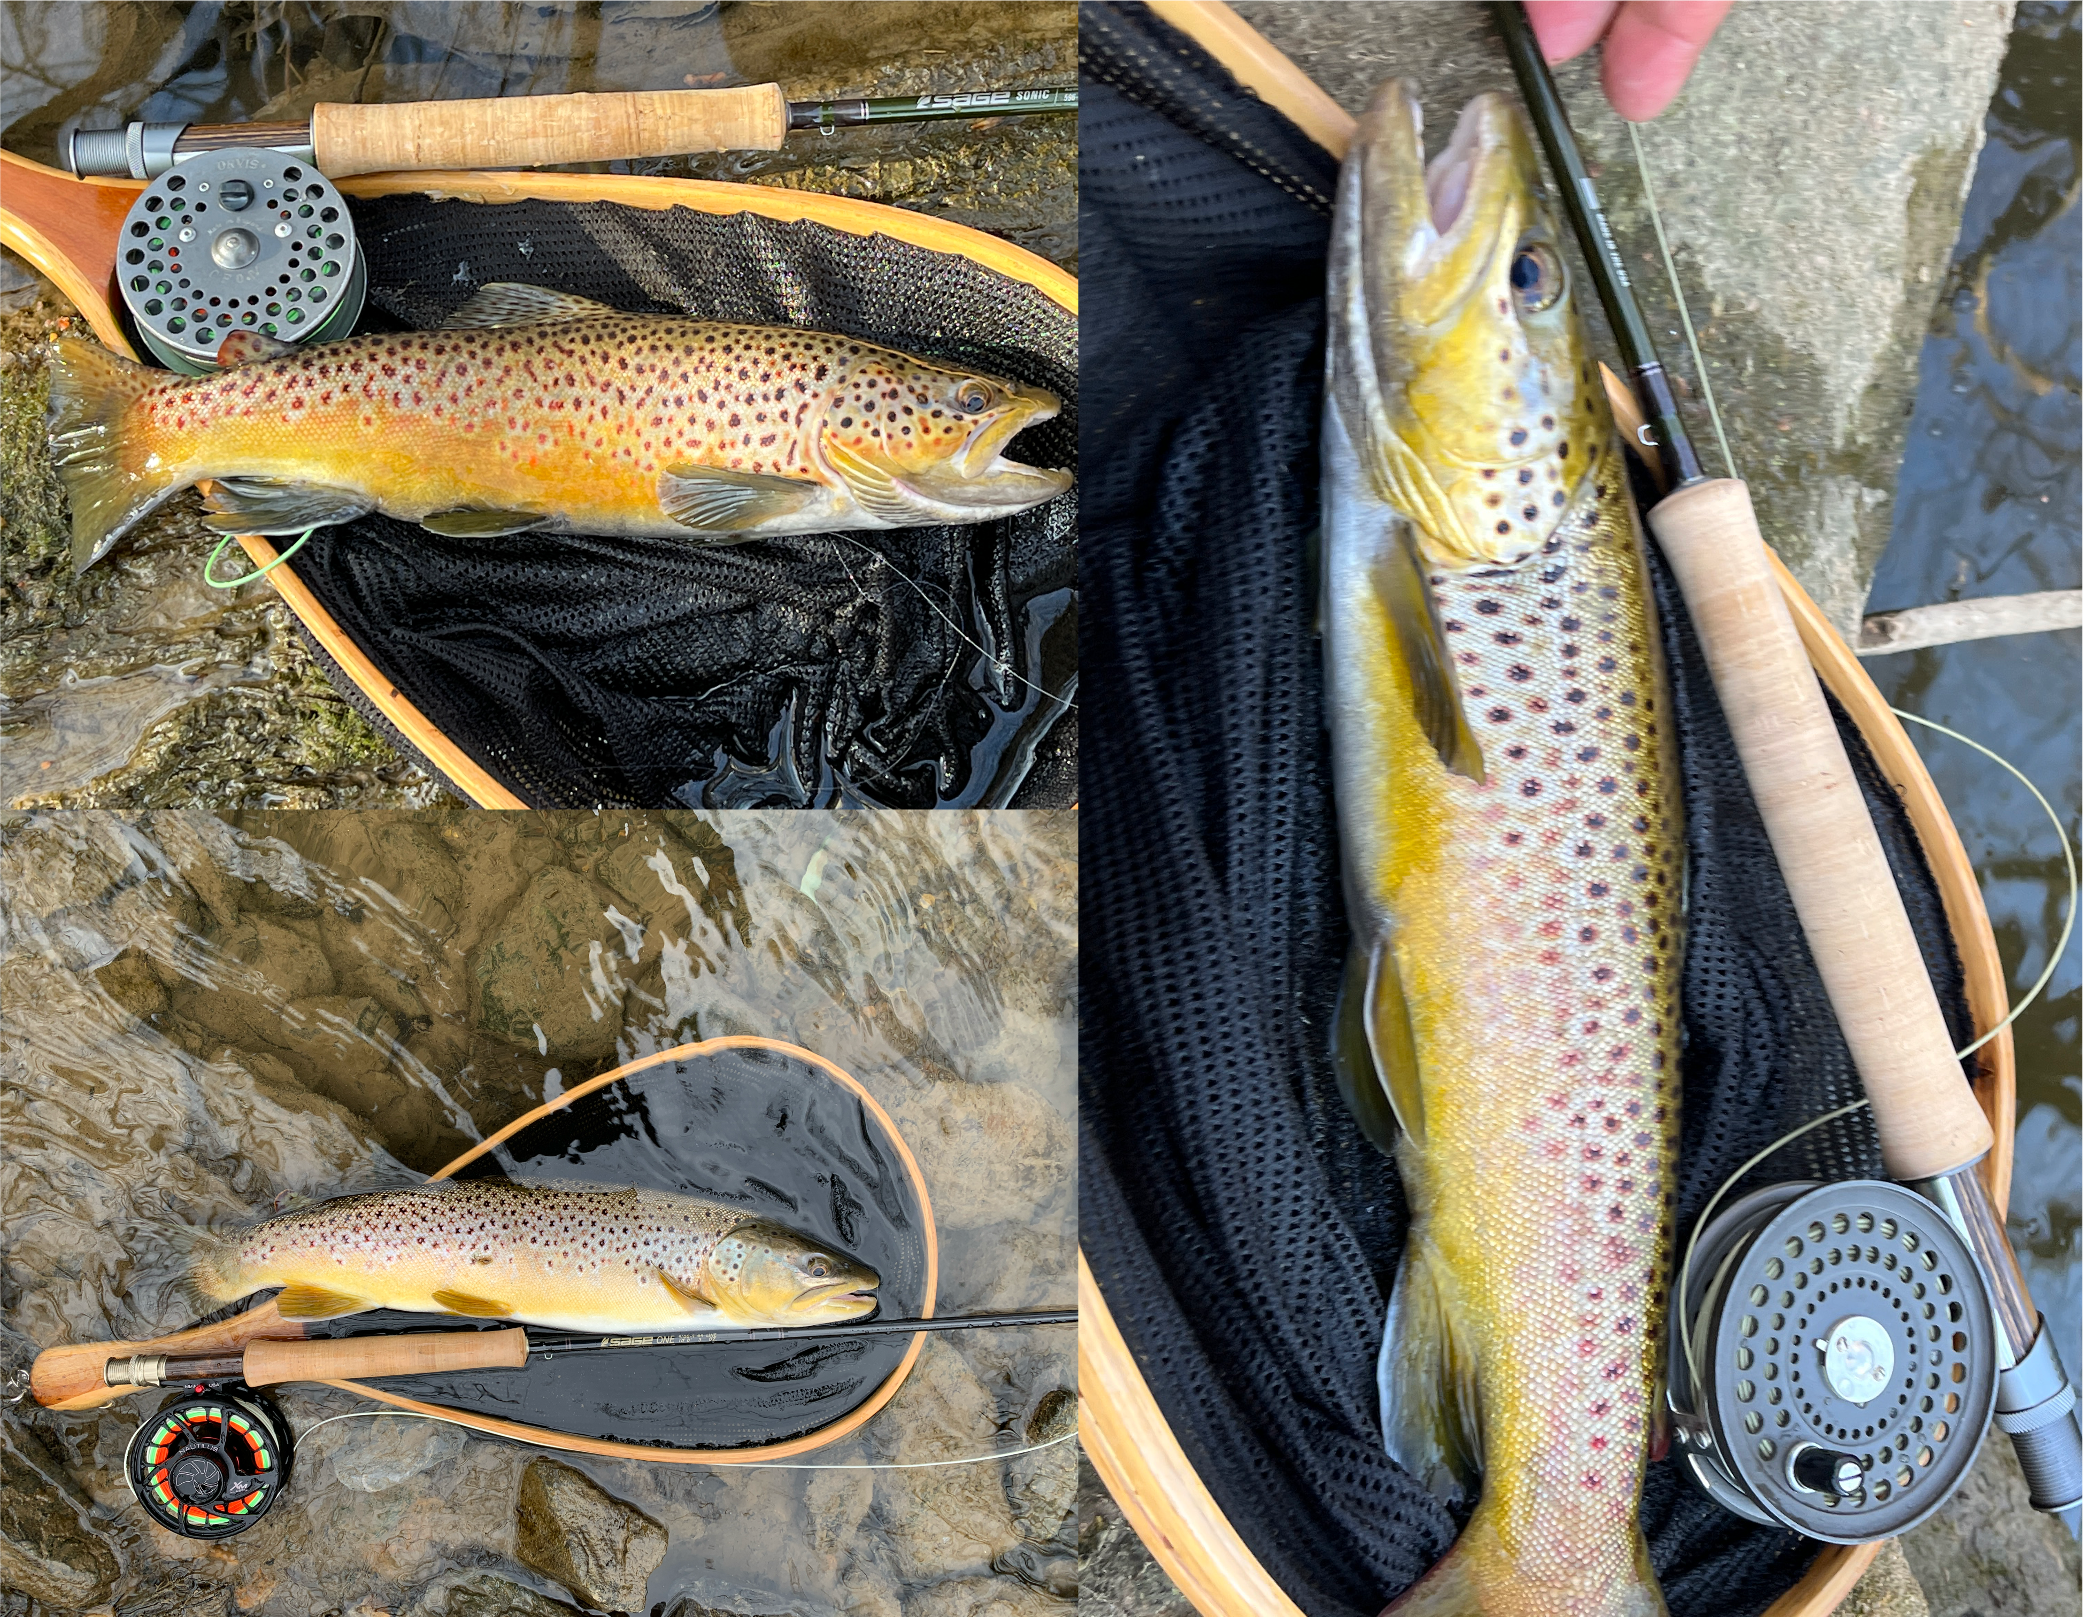
My home stream is full of trout like these, but they are awfully difficult to catch with an indicator rig. The takes are subtle, the currents tricky and the stream bed has sharp undulations. However, fishing a set on nymphs either without an indicator or on a dry dropper rig is extremely productive.
None of this talks about fly patterns. I’ll share my thoughts on those at some other time. These are just some things that work for me. Hopefully they’ll work for you too.